
")
A new request
In November 1320, the Lord of Hornshadow summoned the city council to validate the add a council section to each district. Everyone thought it was a great idea because it could help the residents of the city and also the visitors.
The city council also wanted that this new section should be easy to manage, in case of change in a district council. This council section must display the following informations:
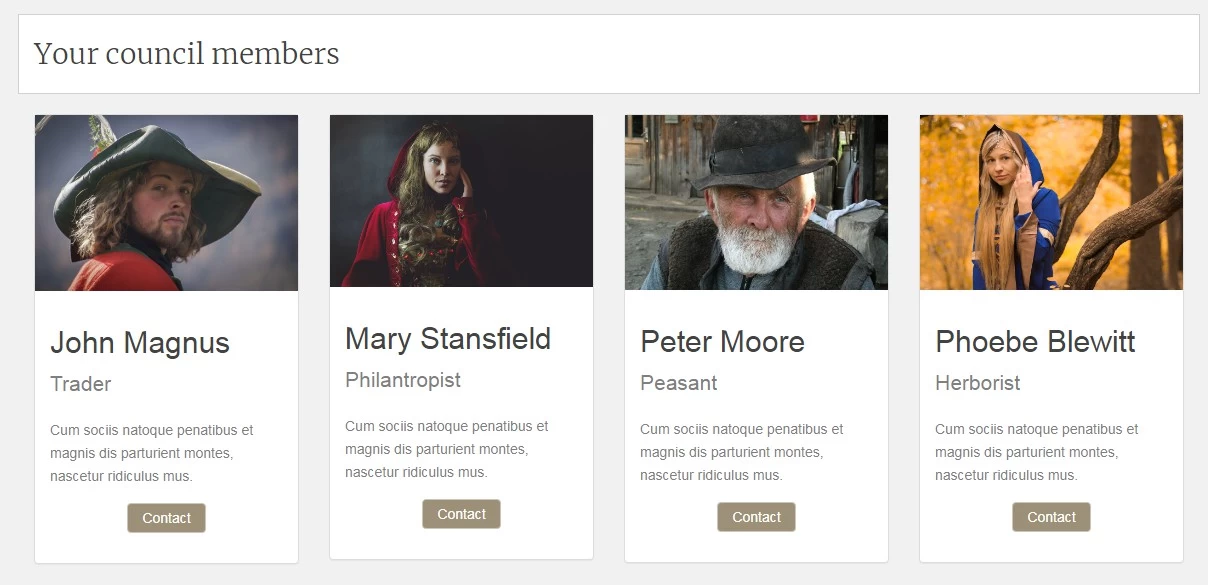
- The pic of each council member
- The name of each council member
- The occupation of each council member
- A brief text about her/him
- And a button to contact her/him
Now, let's have a preview to our team section:
Credits images: @Pixabay
Previously in the #JoomlaOverrideChallenge
How to create a team section in Joomla?
There are mainly 2 ways to present a Team section with Joomla:
- with com_content
- with com_contact
Both are fine and it's up to you to decide whch one is the most accurate for your project and which one is the most comfortable for you. In this example, I'll use com_content.
Basically, a Team section displays details about people (see above). These details are mainly text but also images. So, there is nothing spectacular or impossible here for Joomla. There are few ways to present this feature on a website but the best is always to keep this section as simple as possible for the end user. Make it simple must be your guideline.
If you want to be SEO compliant, you also should consider the smart option to add the Schema markup to your Team section.
I. The category
All the council section is powered by the Joomla native component com_content with a single category: Council.
II. The council members
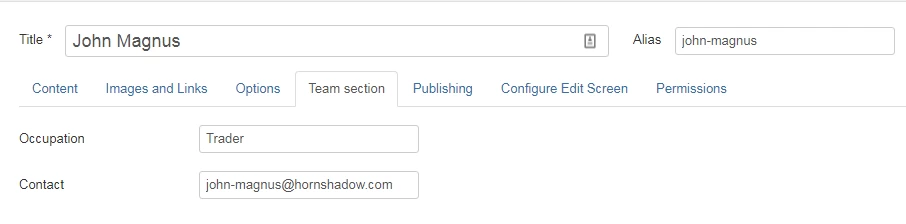
You've understood, each council member will have its own article. This way, this section will be easier to manage for the web-master.
Here is how the details are added in each article:
- The pic of the council member: the intro image
- The name of the council member: the article title
- The occupation of the council member: a custom field
- A brief text about her/him: the intro text of the article
- And a button to contact her/him: a custom field
If you want to add the member's social media links, you can create and add others custom fields. It's the same process.
Let's display our Team section
Ok it's time to have fun with overrides and to display our council members on the website.
Because each member is linked to its district, we'll simply display her/him on the page of its district. Thus, it will be easier for the end user to find the informations on the council members of each district.
To do so, we'll use the powerful native Joomla module mod_articles_category.
As you maybe know, this module doesn't display the intro image. So we'll have to add it in our override.
Here is the code to display the intro image:
<?php
	$article_images  = json_decode($item->images);
	$article_image   = '';
	$article_image_alt   = '';
	if(isset($article_images->image_intro) && !empty($article_images->image_intro)) {
		$article_image  = $article_images->image_intro;
		$article_image_alt  = $article_images->image_intro_alt;
	}?>

	<a href="/<?php echo $item->link; ?>">
		<img class="" src="/<?php echo $article_image; ?>" alt="<?php echo $article_image_alt; ?>" >
	</a>
We'll also need to display the occupation and the link for the contact button. These two informations will be added in backend with customs fields.
Here is the code to display custom fields in an override:
<?php $customFields = FieldsHelper::getFields('com_content.article', $item, true);
		foreach ($customFields as $customField){
		$customFields[$customField->name] = $customField;
	}?>
		<p><?php echo $customFields['name-of-the-custom-field']->value; ?></p>
If it is you're first override in Joomla, I strongly recommand you to read first the previous #JOC articles (see the list above) where you'll find all the useful informations about the steps override creation.
According to the preview, we'll display the members of our team side by side, thanks to the Bootstrap grid.
Here is the code for a member:
<div class="panel panel-default">
			<img src="path/to/the/image.jpg" alt=""/>
 	<div class="panel-body"><h1>Article title</h1>
 	<p class="lead">Sub title</p>
	<p>Cum sociis natoque penatibus et magnis dis parturient montes, nascetur ridiculus mus.</p>
 	<p align="center"><a class="btn btn-primary">Contact</a></p>
	</div>
	</div>
As you can see, it's pretty simple. I use the Bootstrap classes as much as possible to keep my code clean and light.
Now, we can create our override in Joomla.
To help you to understand how I've built it and where are placed the differents elements, I've added comments in the code.
Feel free to add your own customization.
<?php
	/**
		* @package     Joomla.Site
		* @subpackage  mod_articles_category
		* @Author	   web-eau.net
		* @copyright   Copyright (C) 2005 - 2020 Open Source Matters, Inc. All rights reserved.
		* @license     GNU General Public License version 2 or later; see LICENSE.txt
	*/

	defined('_JEXEC') or die;

?>
<div class="row category-module<?php echo $moduleclass_sfx; ?> mod-list">

	<?php foreach ($list as $item) : ?>
	<div class="col-md-3">

		<div class="panel panel-default">

			<!-- The intro image -->
			<?php
				$article_images  = json_decode($item->images);
				$article_image   = '';
				$article_image_alt   = '';
				if(isset($article_images->image_intro) && !empty($article_images->image_intro)) {
					$article_image  = $article_images->image_intro;
					$article_image_alt  = $article_images->image_intro_alt;
				}?>

				<img class="" src="/<?php echo $article_image; ?>" alt="<?php echo $article_image_alt; ?>" >

				<div class="panel-body">

					<!-- The name of the member -->
					<h1 class="">
						<?php echo $item->title; ?>
					</h1>

					<?php $customFields = FieldsHelper::getFields('com_content.article', $item, true);
						foreach ($customFields as $customField){
							$customFields[$customField->name] = $customField;
						}?>

						<!-- The occupation of the member -->
						<p class="lead">
							<?php echo $customFields['occupation']->value; ?>
						</p>

						<!-- The short description -->
						<p class="mod-articles-category-introtext">
							<?php echo $item->displayIntrotext; ?>
						</p>

						<!-- The contact button -->
						<p align="center">
							<a class="btn btn-primary" href="mailto:<?php echo $customFields['contact']->value; ?>">Contact</a>
						</p>

				</div>
		</div>
	</div>
	<?php endforeach; ?>

</div>
Et voilà!
Now, you can create your module Articles - Category and setup accordingly to your needs.
Keep in mind to:
- assign your module to the right page
- assign your module to a valid template position
- add your articles in the right category
- and enjoy your new team section!
Others team section with Joomla overrides created by Joomlers:
- Team seite - Viviana Menzel
- Joomlanistas Unite! - Anja De Crom and Rachel Walraven
- CDA - Tom van der Laan
The Joomla Override Challenge
In association with Viviana Menzel, we've created the unofficial Joomla Override Challenge. The goal is to create each month an override based on an extension or on an project. If you want to participate, feel free to contact Viviana or me :)

