
")
Because nothing beats a (good) tutorial to understand and learn, I suggest you follow this series of articles which will allow you to discover HTML code and the creation of overrides in Joomla. In order to explain the entire design and then production process in detail, we are going to design an e-commerce page from A to Z including the following three parts:
- the presentation of a product with its title, its description, a shopping cart button, its price and a slideshow to display different images of the product,
- a comparison table with differents products related to the item,
- and three complementary products, also related to the item.
In the first tutorial How to Create Overrides in Joomla, we saw in detail how to design and realize these three parts in HTML code. These parts are static, that is to say that the contents will not change until you modify the code.
In the second tutorial How to Create Overrides in Joomla, we saw how to prepare our content, how to organize it in order to make these parts dynamic, that is to say that the contents will change automatically as soon as you update an article or a module in Joomla.
And finally in this third and last tutorial, I'll show you how to create the overrides in Joomla to get the next product page:
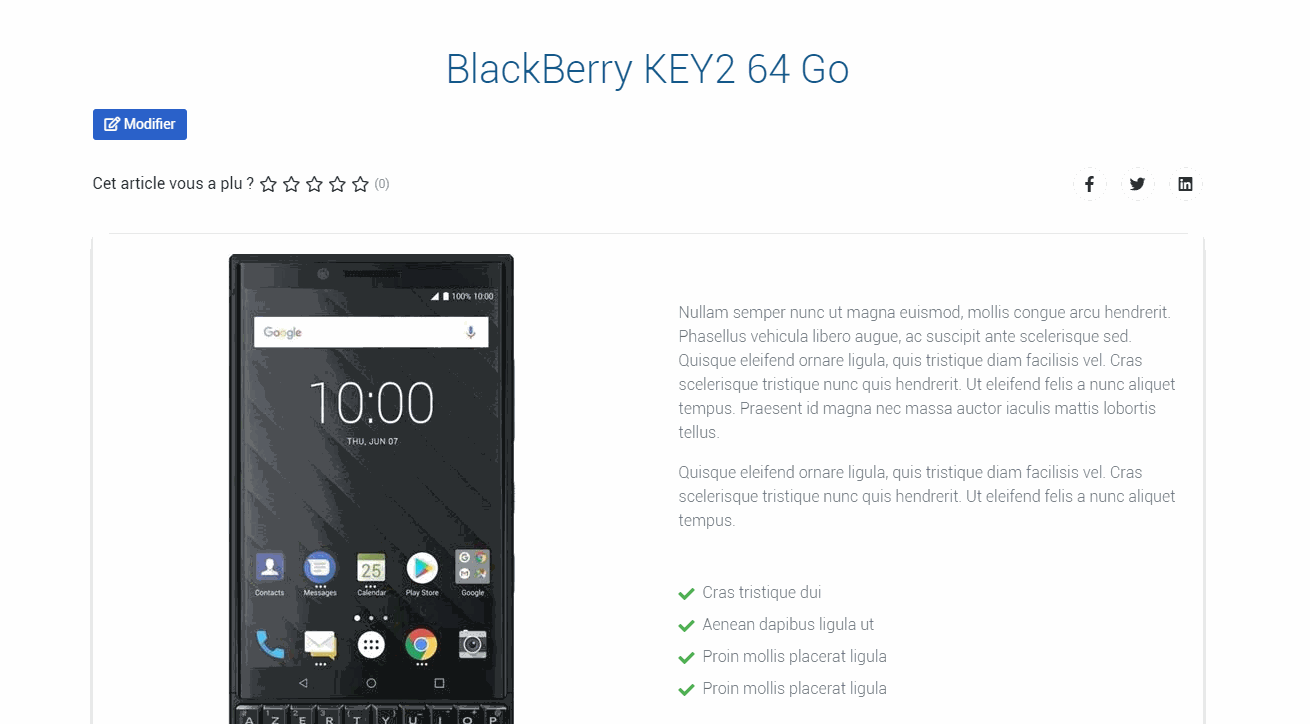
Creation of a product page using overrides in Joomla
How to create an override in Joomla?
DIn the first article, we created our product sheet in HTML language. In the second article, we have set up all the necessary elements in Joomla to display the information we want by creating the article categories, the articles, the custom fields and the modules. It is now time to integrate the code of the first tutorial into the code of the second tutorial. But rest assured, there is nothing very complicated in this operation.
The creation of an override is a technique which allows to partially or totally modify the view of any Joomla extension: component, module, template, language, etc. while working on a copy of this view. The huge advantage of this technique is that the changes will not be overwritten when updating Joomla.
The detailled process
Open Extensions - Templates - Templates.
Then, clic on your template name (Protostar, in this example).

Open the Create Overrides tab.
To create our entire e-commerce page, we will need to create
- an article override to display the product sheet,
- an Articles Categorie module override to display the comparison table,
- a Articles Related module override to display the related products.
Since the process of creating an override is the same for any extension, we just need to repeat the following steps for each override.
The mod_articles_category and mod_related_items modules are listed and displayed in the first column named Modules while the files concerning the article are in the column Component and by clicking on com_content.
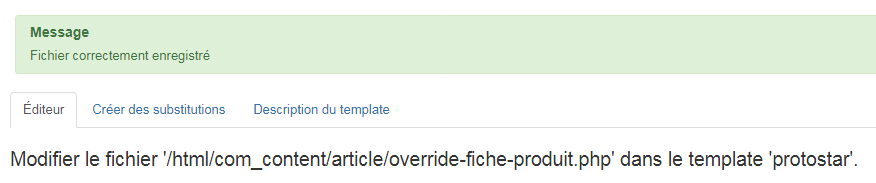
To create an override, simply click on the extension to duplicate.
A message confirms that the operation was successful.

We have to repeat the operation to obtain our 3 necessary overrides.
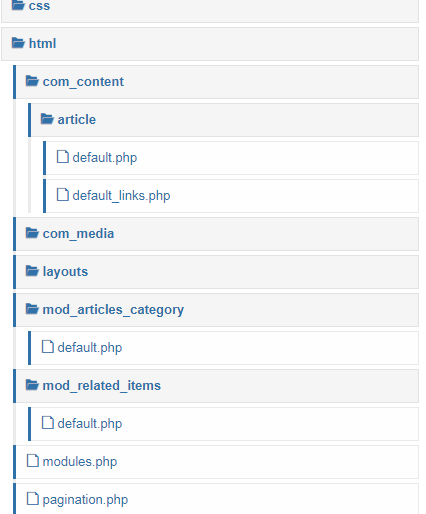
After this is done, we have the following folders and files in the HTML folder of our template :
And that is all ! Creating an override in Joomla is no more complicated than that :)
Now, we are going to modify the 3 views that we just duplicated in the template with the HTML code we've created in the first part of the tutorial.
The product sheet
The folders and files concerned by this part are located in the folder HTML - com_content.
First, we are going to create a copy of the file that we are going to modify. By doing this, we will:
- rename our now file, which will be easier to find it later,
- and be able to make multiple copies and overrides of the same view.
Click on the New file button, on the top of your page.

In the new window, click first on Article (to select this folder).
In the right, indicate the name of the file (override-product-sheet, for example) then, select php in the dropdown.
Then, click on the Create button.

Our new file override-product-sheet.php is empty but ready to be used.
On the left, click on the default.php file to open it in the editor.
Copy the all code.
Paste the all code in the new file created earlier.
Click on the Save button.
Okay now, we will have to learn to navigate to know where to make / add our changes. Again, we will see that it is much less complicated than it seems.
Open the override-product-sheet.php file in the editor.
No need to panic at this point in the tutorial because our new file is not used anywhere on our site, so we don't risk breaking anything.
We must add our HTML code in the part that displays the article body. So, let's scroll through the code displayed in the editor to find lines 108 to 110:
<div itemprop="articleBody">
	<?php echo $this->item->text; ?>
</div>
Note that the content of line 109 displays the text of the article, that is to say the description of our product.
It is therefore at this exact point of the file that we will have to add all the HTML code of our product sheet. But before that, we will have to modify the HTML code that we created in the first episode to add our custom fields in the right places.
Let's take our code created during the first episode:
<section class="mb-5">
	<!-- Titre de section -->
	<h3 class="text-center font-weight-bold mb-5">Fiche produit</h3>

	<div class="row">
		<div class="col-md-12">
			<div class="card">
				<div class="card-body">
					<div class="row h-100 d-flex align-items-center">
						<div class="col-lg-6">

							<!-- Slideshow -->
							<div id="carousel-thumb" class="carousel slide carousel-thumbnails" data-ride="carousel">
								<div class="carousel-inner text-center text-md-left" role="listbox">
									<div class="carousel-item active">
										<img src="url/to/my/image.jpg" alt="" class="img-fluid">
									</div>
									<div class="carousel-item">
										<img src="url/to/my/image.jpg" alt="" class="img-fluid">
									</div>
									<div class="carousel-item">
										<img src="url/to/my/image.jpg" alt="" class="img-fluid">
									</div>
								</div>

								<a class="carousel-control-prev" href="#carousel-thumb" role="button" data-slide="prev">
									<span class="carousel-control-prev-icon" aria-hidden="true"></span>
									<span class="sr-only">Previous</span>
								</a>
								<a class="carousel-control-next" href="#carousel-thumb" role="button" data-slide="next">
									<span class="carousel-control-next-icon" aria-hidden="true"></span>
									<span class="sr-only">Next</span>
								</a>
							</div>
							<!-- /Slideshow -->

						</div>
						<div class="col-lg-6">

							<!-- Description -->
							<p class="text-muted font-weight-light ml-3 mb-5">Proin a risus sodales, hendrerit odio non, condimentum augue. Vivamus id libero ante. In sem diam, semper vel sodales et, placerat a turpis. Suspendisse tristique diam mattis, venenatis metus ut cursus
							</p>

							<!-- List of the features -->
							<ul class="fa-ul mb-5 text-muted font-weight-light">
								<li class="mb-2"><span class="fa-li"><i class="fas fa-check green-text"></i></span>Morbi at iaculis nis</li>
								<li class="mb-2"><span class="fa-li"><i class="fas fa-check green-text"></i></span>Donec ac lectus ut mist</li>
								<li class="mb-2"><span class="fa-li"><i class="fas fa-check green-text"></i></span>Vivamus luctus odio vitae</li>
								<li class="mb-2"><span class="fa-li"><i class="fas fa-check green-text"></i></span>Duis porttitor enim eu mollis</li>
							</ul>

							<!-- Button and price -->
							<div class="d-flex justify-content-between ml-3">
								<button type="button" class="btn btn-primary mx-0">Acheter</button>
								<div class="text-center">
									<h4 class="mb-0">399 €</h4>
									<small class="grey-text">+ 10 € Shipping fees</small>
								</div>
							</div>

						</div>

					</div>
				</div>
			</div>
		</div>

	</div>
</section>
On line 26 of our new file override-product-sheet.php, we add the following code:
<!-- Product sheet title -->
<div class="article-header bleu mb-3 text-center">
	<h1 itemprop="headline"><?php echo $this->escape($this->item->title); ?></h1>
</div>
This code will display our article title (i.e. our product) in the middle of the page, in bold and in a H1 tag.
The slideshow
If you haven't already, I advise you to open your favorite text editor now (Notepad ++, for example) and paste the HTML code from our product file into it.
First, delete the section tags at the beginning and end of the file as well as the line which displays the title of the product since we have just used the Joomla code for this.
The lines of code displaying the slideshow must be between lines 8 and 31. If not, you should adjust the file that is in your code editor so that the numbering of your lines corresponds to that of this tutorial.
To display the slideshow images, we will add the Custom Fileds ID which contain the URL addresses of the slideshow images. Which gives us the following code:
<div class="text-center  carousel-item active">
	<img src="<?php echo $this->item->jcfields[XX]->value; ?>" alt="" class="img-fluid">
</div>
<div class="text-center  carousel-item">
	<img src="<?php echo $this->item->jcfields[XX]->value; ?>" alt="" class="img-fluid">
</div>
<div class="text-center  carousel-item">
	<img src="<?php echo $this->item->jcfields[XX]->value; ?>" alt="" class="img-fluid">
	</div>
Explanations
In the previous episode, we've created custom fields to add these images (3, in this example). As with articles, custom fields are identified by an ID. We must therefore enter in this code, the ID of our custom fields instead of XX.
Copy this code and paste it replacing lines 11-19 of the HTML file.
The product description
The lines of code displaying the product description are included between lines 36 and 38.
Delete the Lorem Ipsum text and instead, copy the content of line 109 of the file override-product-sheet.php. This should give us the following code :
<!-- Description -->
<p class="text-muted font-weight-light ml-3 mb-5"><?php echo $this->item->text; ?>
</p>
The list of features
The lines of code showing the list of the features of the product are between lines 40 and 46.
Same operation as for the slideshow, the goal is to replace the Lorem Ipsum text with the corresponding personalized fields. Note the IDs of these custom fields and enter them in the HTML file like this, replacing the corresponding lines:
<li class="mb-2"><span class="fa-li"><i class="fas fa-check green-text"></i></span><?php echo $this->item->jcfields[XX]->value; ?></li>
<li class="mb-2"><span class="fa-li"><i class="fas fa-check green-text"></i></span><?php echo $this->item->jcfields[XX]->value; ?></li>
<li class="mb-2"><span class="fa-li"><i class="fas fa-check green-text"></i></span><?php echo $this->item->jcfields[XX]->value; ?></li>
<li class="mb-2"><span class="fa-li"><i class="fas fa-check green-text"></i></span><?php echo $this->item->jcfields[XX]->value; ?></li>
The price, the shipping fees and the add to cart button
The lines of code displaying this part are between lines 48 and 55.
Again, you should place the code of your custom fields in the right place in the code, namely:
<!-- Button and price -->
<div class="d-flex justify-content-between mr-3">
	<div class="text-center">
		<h4 class="mb-0"><?php echo $this->item->jcfields[XX]->value; ?></h4>
		<small class="grey-text">+<?php echo $this->item->jcfields[XX]->value; ?> frais de port</small>
	</div>
	<a href="<?php echo $this->item->jcfields[XX]->value; ?>" target="_self" type="button" class="btn btn-primary mx-0">Add to Cart</a>
</div>
The complete code
Now that you are done making all the changes to your HTML file, compare it with this code below to verify that you haven't forgotten anything along the way.
<div class="row">
	<div class="col-md-12">
		<div class="card">
			<div class="card-body">
				<div class="row h-100 d-flex align-items-center">
					<div class="col-lg-6">

						<!-- Slideshow -->
						<div id="carousel-thumb" class="carousel slide carousel-thumbnails" data-ride="carousel">
							<div class="carousel-inner text-center text-md-left" role="listbox">
								<div class="text-center  carousel-item active">
									<img src="<?php echo $this->item->jcfields[XX]->value; ?>" alt="" class="img-fluid">
								</div>
								<div class="text-center  carousel-item">
									<img src="<?php echo $this->item->jcfields[XX]->value; ?>" alt="" class="img-fluid">
								</div>
								<div class="text-center  carousel-item">
									<img src="<?php echo $this->item->jcfields[CC]->value; ?>" alt="" class="img-fluid">
								</div>
							</div>

							<a class="carousel-control-prev" href="#carousel-thumb" role="button" data-slide="prev">
								<span class="carousel-control-prev-icon" aria-hidden="true"></span>
								<span class="sr-only">Previous</span>
							</a>
							<a class="carousel-control-next" href="#carousel-thumb" role="button" data-slide="next">
								<span class="carousel-control-next-icon" aria-hidden="true"></span>
								<span class="sr-only">Next</span>
							</a>
						</div>
						<!-- /Slideshow -->

					</div>
					<div class="col-lg-6">

						<!-- Description -->
						<p class="text-muted font-weight-light ml-3 mb-5"><?php echo $this->item->text; ?>
						</p>

						<!-- List of the features -->
						<ul class="fa-ul mb-5 text-muted font-weight-light">
							<li class="mb-2"><span class="fa-li"><i class="fas fa-check green-text"></i></span><?php echo $this->item->jcfields[XX]->value; ?></li>
							<li class="mb-2"><span class="fa-li"><i class="fas fa-check green-text"></i></span><?php echo $this->item->jcfields[XX]->value; ?></li>
							<li class="mb-2"><span class="fa-li"><i class="fas fa-check green-text"></i></span><?php echo $this->item->jcfields[XX]->value; ?></li>
							<li class="mb-2"><span class="fa-li"><i class="fas fa-check green-text"></i></span><?php echo $this->item->jcfields[XX]->value; ?></li>
						</ul>

						<!-- Button and price -->
						<div class="d-flex justify-content-between mr-3">
							<div class="text-center">
								<h4 class="mb-0"><?php echo $this->item->jcfields[XX]->value; ?></h4>
								<small class="grey-text">+<?php echo $this->item->jcfields[XX]->value; ?> frais de port</small>
							</div>
                            <a href="<?php echo $this->item->jcfields[XX]->value; ?>" target="_self" type="button" class="btn btn-primary mx-0">Add to Cart</a>
						</div>
					</div>
				</div>
			</div>
		</div>
	</div>
</div>
If it's ok, we can copy it in its entirety and paste it instead of line 109 of our file override-product-sheet.php.
Click the Save button. Now, when we change the content of our article or one of its custom fields, our override will be automatically updated.
How to use our override?
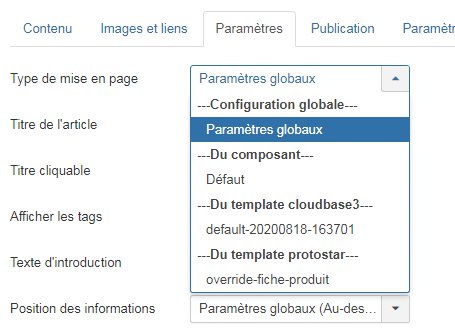
Now, we need to apply our override to our article. To do this, open our article.
In the Options tab, the first parameter allows us to select the type of layout we want for this article. Select override-product-sheet in the dropdown list then Save.
Now, open your Joomla article to see your product is correctly displayed.
Article layout in Joomla
The comparison table
In the second episode, we have prepared everything we needed to display this part, namely:
- our article category Téléphones with the articles for each product,
- our custom fields for the main features of our products (memory, weight, width, camera, etc),
- our Articles - Categorie module who will have to display our comparison table.
Concretely, we must therefore create an override for our Articles - Category module in order to dynamically generate a table with the data contained in each of the articles of the Téléphones category. This means that when we will update any data from one of these articles, the comparison table will be updated automatically.
We start by creating the central part of the table with the tbody which will display the content of each row of our table with the title of the product and then, each of its characteristics:
<tbody>

	<!-- Code pour appeler les champs personnalisés -->
	<?php $customFields = FieldsHelper::getFields('com_content.article', $item, true);
		foreach ($customFields as $customField){
			$customFields[$customField->name] = $customField;
		}?>

		<!-- Content of each row of our comparison table -->
		<tr>
			<th scope="row"><strong><?php echo $item->title; ?></strong></th>
			<td><?php echo $customFields['memory']->value; ?></td>
			<td><?php echo $customFields['weight']->value; ?></td>
			<td><?php echo $customFields['width']->value; ?></td>
			<td><?php echo $customFields['thickness']->value; ?></td>
			<td><?php echo $customFields['camera']->value; ?></td>
			<td><?php echo $customFields['video']->value; ?></td>
		</tr>

</tbody>
You will have noticed that the loop that allows us to generate as many lines as there are articles is missing. But rest assured, we will add it later.
The rest of our override is actually quite simple to build since the header of the table is made up of static data.
<thead>
	<tr>
		<th><strong>Model;le</strong>
		</th>
		<th>
			<strong>Memory;</strong>
		</th>
		<th>
			<strong>Weight</strong>
		</th>
		<th>
			<strong>Width</strong>
		</th>
		<th>
			<strong>Thickness</strong>
		</th>
		<th>
			<strong>Camera</strong>
		</th>
		<th>
			<strong>Video</strong>
		</th>
	</tr>
</thead>
Now we just have to put it all together, keeping in mind that our articles will be grouped by category.
Here is our complete code to past in our override:
<div class="category-module<?php echo $moduleclass_sfx; ?>">
	<?php foreach ($list as $group_name => $group) : ?>
	<div class="card">
		<div class="card-body">
			<table class="table table-responsive-md mb-0">
				<thead>
					<tr>
						<th><strong>Model;</strong>
						</th>
						<th>
							<strong>Memory;</strong>
						</th>
						<th>
							<strong>Weight</strong>
						</th>
						<th>
							<strong>Width</strong>
						</th>
						<th>
							<strong>Thickness</strong>
						</th>
						<th>
							<strong>Camera</strong>
						</th>
						<th>
							<strong>Video</strong>
						</th>
					</tr>
				</thead>
				<tbody>
					<?php foreach ($group as $item) : ?>
					<?php $customFields = FieldsHelper::getFields('com_content.article', $item, true);
						foreach ($customFields as $customField){
							$customFields[$customField->name] = $customField;
						}?>
						<tr>
							<th scope="row"><strong><?php echo $item->title; ?></strong></th>
							<td><?php echo $customFields['memory']->value; ?></td>
							<td><?php echo $customFields['weight']->value; ?></td>
							<td><?php echo $customFields['width']->value; ?></td>
							<td><?php echo $customFields['thickness']->value; ?></td>
							<td><?php echo $customFields['camera']->value; ?></td>
							<td><?php echo $customFields['video']->value; ?></td>
						</tr>
						<?php endforeach; ?>
				</tbody>
			</table>
		</div>
	</div>
	<?php endforeach; ?>
</div>
Don't forget to click save.
Let's apply out override
Now, we have to apply our override to our module. To do this, let's open our module Articles - Categroy created at episode 2.
In the Advanced tab, the first parameter allows us to select the type of layout we want for this module. Select the override we have just created in the dropdown list then save.
Now, let's have a look to the page containing our module to see that our comparison table display our data as expected.

Module layout in Joomla
The three complementary products
And here we are already at the last part of our product page. If you've been following the previous two episodes, everything should be in place and ready to go as expected. All we have to do is create the override to display our complementary products as desired.
The module used here - Articles - Related - does not display the intro image of the article, by default. We will also need to take the price of the product that is available through the custom fields.
No panic, each part of the override code will be explained.
The product image
In the previous episode, we have added an intro image to the Accessories items. So we'll call this image in our override, like this:
<!-- php code to call the intro image of an article -->
<?php
	$article_images  = json_decode($item->images);
	$article_image   = '';
	$article_image_alt   = '';
	if(isset($article_images->image_intro) && !empty($article_images->image_intro)) {
		$article_image  = $article_images->image_intro;
		$article_image_alt  = $article_images->image_intro_alt;
	}?>

	<div class="view overlay p-5">

		<!-- Product image -->
		<a href="#">
			<img class="card-img-top img-fluid" src="<?php echo $article_image; ?>" alt="<?php echo $article_image_alt; ?>" >
			<div class="mask rgba-white-slight"></div>
		</a>
	</div>
Please note, some CSS classes added here are specific to my framework and may not work with yours.
The product title
Nothing very complicated here since the title of the product corresponds to the title of the article. We simply add an A, B or C link to display badge next to the title.
<!-- Code PhP pour appeler les URLs -->
<?php $item->urls = new JRegistry($item->urls); ?>

<!-- Titre du produit -->
<h5 class="card-title mb-3">
	<strong>
		<a class="dark-grey-text mod-articles-category-title <?php echo $item->active; ?>" href="#">
			<?php echo $item->title; ?>
			<span class="badge badge-pill danger-color"><?php echo $item->urls->get('urlatext'); ?></span>
			<span class="badge badge-pill primary-color"><?php echo $item->urls->get('urlbtext'); ?></span>
			<span class="badge badge-pill success-color"><?php echo $item->urls->get('urlctext'); ?></span>
		</a>
	</strong>
</h5>
The product price
To display the price, we call again our custom fields.
<!-- Custom fileds -->
<?php $customFields = FieldsHelper::getFields('com_content.article', $item, true);
	foreach ($customFields as $customField){
		$customFields[$customField->name] = $customField;
	}?>

	<!-- Price -->
	<h5 class="font-weight-bold blue-text mb-0"><?php echo $customFields['price']->value; ?></h5>
The complete code of the override
There we have it, we just have to assemble all this to generate our override. We add the CSS classes allowing to display our products in 3 columns and we will use here Flexbox for the responsive rendering.
<div class="row relateditems<?php echo $moduleclass_sfx; ?>">

	<?php foreach ($list as $item) : ?>

	<div class="col-lg-4 col-md-6 mb-4 d-flex align-items-stretch">
		<div class="card align-items-center">

			<?php
				$article_images  = json_decode($item->images);
				$article_image   = '';
				$article_image_alt   = '';
				if(isset($article_images->image_intro) && !empty($article_images->image_intro)) {
					$article_image  = $article_images->image_intro;
					$article_image_alt  = $article_images->image_intro_alt;
				}?>

				<div class="view overlay p-5">
					<!-- Product image -->
					<a href="#">
						<img class="card-img-top img-fluid" src="<?php echo $article_image; ?>" alt="<?php echo $article_image_alt; ?>" >
						<div class="mask rgba-white-slight"></div>
					</a>
				</div>

				<div class="card-body text-center">

                    <?php $item->urls = new JRegistry($item->urls); ?>

					<!-- Product name -->
					<h5 class="card-title mb-3">
						<strong>
							<a class="dark-grey-text mod-articles-category-title <?php echo $item->active; ?>" href="#">
								<?php echo $item->title; ?>
								<span class="badge badge-pill danger-color"><?php echo $item->urls->get('urlatext'); ?></span>
								<span class="badge badge-pill primary-color"><?php echo $item->urls->get('urlbtext'); ?></span>
								<span class="badge badge-pill success-color"><?php echo $item->urls->get('urlctext'); ?></span>
							</a>
						</strong>
					</h5>

					<?php $customFields = FieldsHelper::getFields('com_content.article', $item, true);
						foreach ($customFields as $customField){
							$customFields[$customField->name] = $customField;
						}?>

						<!-- Price -->
						<h5 class="font-weight-bold blue-text mb-0"><?php echo $customFields['price']->value; ?></h5>

				</div>

		</div>
	</div>
	<?php endforeach; ?>

</div>
Don't forget to click the Save button !
Let's apply our override
Now, we have to apply this override to our module. To do this, open our module Article Related created in the previous episode.
In the Advanced tab, the first parameter allows us to select the type of layout we want for this module. Select the override we have just created in the dropdown list then Save.
Now, let's have a look to the page with our module to see that our complementary products are showing as expected.

Module layout in Joomla
Conclusion
There we have it, we have just finished the third and last part of this tutorial dedicated to the overrides in Joomla. Admit that it was not as complicated as you thought!
Take the time to carefully reread each part, to do tests, to modify and why not, to improve everything you want so that the final result is perfectly adapted to your project.
See you in the comments below if you have any comments or questions about Joomla and overrides.
Thanks for reading.

